Unit testing for absolute beginners

Recently at Everest Engineering, I got an opportunity to teach unit testing to our interns. I thought of sharing the content that I prepared for the session with the world so that it may benefit some beginners out there. Read on...
What is Testing?
In simple terms, its a process of checking something if it does what it intended to do
example:
Let's say you are given a Bluetooth speaker and asked to test it. What do you do?
.
.
.
Keep thinking… brb 🙂
.
.
.
Okay, Let me tell you what I do. I will pair the speaker to my mobile phone via Bluetooth and play my favorite songs from my Spotify playlist, and see if the sound is coming from the speaker. If it is coming from the speaker, I will say it works, otherwise, it does not.
If you look at it closely, while you test something, you always have following steps
Arrange: You setup it so that it is ready to be tested
- Pairing the speaker with a phone ( of course you can test whether the Bluetooth is capable of connecting to phones, it is a different use case, let's keep it aside)
Act: You pass some input
- You play songs
Assert: You expect something of the system that you are testing
- Sound output from the speaker
What is unit testing?
Each system has many independent features that can be tested alone
In our case, these are the candidates for units
Feature that allows us to pair Bluetooth speakers with input devices like speakers, laptops..etc
Feature that plays songs
Feature that lets us control pause the music
Feature that lets us control playing the music
Feature that lets us increase the volume
Feature that lets us decrease the volume
Finally, a feature that allows disconnecting from the input devices
When it comes to testing software, a unit can be a function, a class and its public API ( yes never test private methods directly ), or a feature that involves multiple classes. To keep things simple let's take functions, and classes as units, and let's move further.
Unit test
Let's write our first unit test
Please download the starter project from this link. It uses Typescript as a programming language, and Jest as the testing framework. The starter project is taken from here. If you are curious about the files inside it, please check this blog post out. There are a lot of files, but our main interest is going to on index.ts, index.spec.ts for now. index.ts file is where we write the code, and we write our tests inside index.spec.ts . Come, let's write our first test
// index.js

export function add(x: number, y: number): number {
  return x + y;
}
Our code is simple, it is just a function that takes two numbers and adds them together, and returns the result. Let's write a test for it
import { add } from './index';

describe('test calculator', () => {
  test('add', async () => {
    // Arrange
    // Our code at the moment is too simple and does not need any setup

    // Act
    const result = add(10, 1);

    // Assert
    expect(result).toEqual(11);
  });
});
Let's run our tests
npm run test
Your output should look something like this
> jest

 PASS  src/index.spec.ts
  test calculator
    ✓ add (1 ms)

Test Suites: 1 passed, 1 total
Tests:       1 passed, 1 total
Snapshots:   0 total
Time:        1.038 s, estimated 2 s
Ran all test suites.
Unit testing classes
Let's write another program and test it. This time using classes. We are going to write a simple calculator program. Let’s get our hands on the keyboard and code it up
Let’s create a file calculator.ts and add the following class to it
// calculator.ts

export default class Calculator {
  public add(x: number, y: number): number {
    return x + y;
  }
}
We have added a class with add function, which is similar to what we had in the earlier example. Let's test it now
// calculator.spec.ts

import Calculator from './calculator';

describe('test calculator', () => {
  test('test add', () => {
    // Arrange
    const calc = new Calculator();

    // Act
    const result = calc.add(2, 4);

    // Assert
    expect(result).toBe(6);
  });
}
Here we got Arrange step as well, which instantiates the class and stores the reference into the constant variable calc
Let's run the tests
npm run test calculator
Your output should look something like this
PASS  src/calculator.spec.ts
  test calculator
    ✓ test add (1 ms)

Test Suites: 1 passed, 1 total
Tests:       1 passed, 1 total
Snapshots:   0 total
Time:        2.98 s
Ran all test suites matching /calculator/i.
Let's finish other methods like subtraction, multiplication, and division. Handle zero division as well, throw an Error if the user tries to divide with Zero.
Let's have a look at the finished code and tests
// calculator.ts
export default class Calculator {
  public add(x: number, y: number): number {
    return x + y;
  }

  public subtract(x: number, y: number): number {
    return x - y;
  }

  public multiply(x: number, y: number): number {
    return x * y;
  }

  public division(x: number, y: number): number {
    if (y === 0) {
      throw new Error('Zero division error');
    }
    return x / y;
  }
}
import Calculator from './calculator';

describe('test calculator', () => {
  test('test add', () => {
    // Arrange
    const calc = new Calculator();

    // Act
    const result = calc.add(2, 4);

    // Assert
    expect(result).toBe(6);
  });

  test('test subtract', () => {
    // Arrange
    const calc = new Calculator();

    // Act
    const result = calc.subtract(10, 2);

    // Assert
    expect(result).toBe(8);
  });

  test('test subtract from smaller number', () => {
    // Arrange
    const calc = new Calculator();

    // Act
    const result = calc.subtract(2, 10);

    // Assert
    expect(result).toBe(-8);
  });

  test('test multiply', () => {
    // Arrange
    const calc = new Calculator();

    // Act
    const result = calc.multiply(2, 10);

    // Assert
    expect(result).toBe(20);
  });

  test('test division', () => {
    // Arrange
    const calc = new Calculator();

    // Act
    const result = calc.division(10, 2);

    // Assert
    expect(result).toBe(5);
  });

  test('should not allow dividing with zero', () => {
    // Arrange
    const calc = new Calculator();

    // Act & Assert
    expect(() => calc.division(10, 0)).toThrow('Zero division error');
  });
});
If you see the above solution, we have covered zero division error as well. It is important to test all the critical paths/flows while you write your unit tests. You can use code coverage tools to see if you have any uncovered code. Let's have a look at them now
Measuring code coverage
Open your package.json file and add the following line under scripts section
"scripts": {
// ... other commands
    "test": "jest",
    "test-cov": "jest --coverage"
},
For the sake of this example, please skip the last test that covers zero division error. You can skip a test using test.skip('<name>') syntax
// Calculator.spec.ts

// other tests
test.skip('should not allow dividing with zero', () => {
  // Arrange
  const calc = new Calculator();

  // Act & Assert
  expect(() => calc.division(10, 0)).toThrow('Zero division error');
});
Now run npm run test-cov
jest --coverage
PASS src/index.spec.ts
PASS src/wallet.spec.ts
❯ npm run test
> typescript-starter@1.0.0 test
> jest --coverage
PASS src/index.spec.ts
PASS src/wallet.spec.ts
❯ npm run test-cov
> typescript-starter@1.0.0 test-cov
> jest --coverage
PASS src/index.spec.ts
PASS src/calculator.spec.ts
PASS src/wallet.spec.ts
---------------|---------|----------|---------|---------|-------------------
File | % Stmts | % Branch | % Funcs | % Lines | Uncovered Line #s
---------------|---------|----------|---------|---------|-------------------
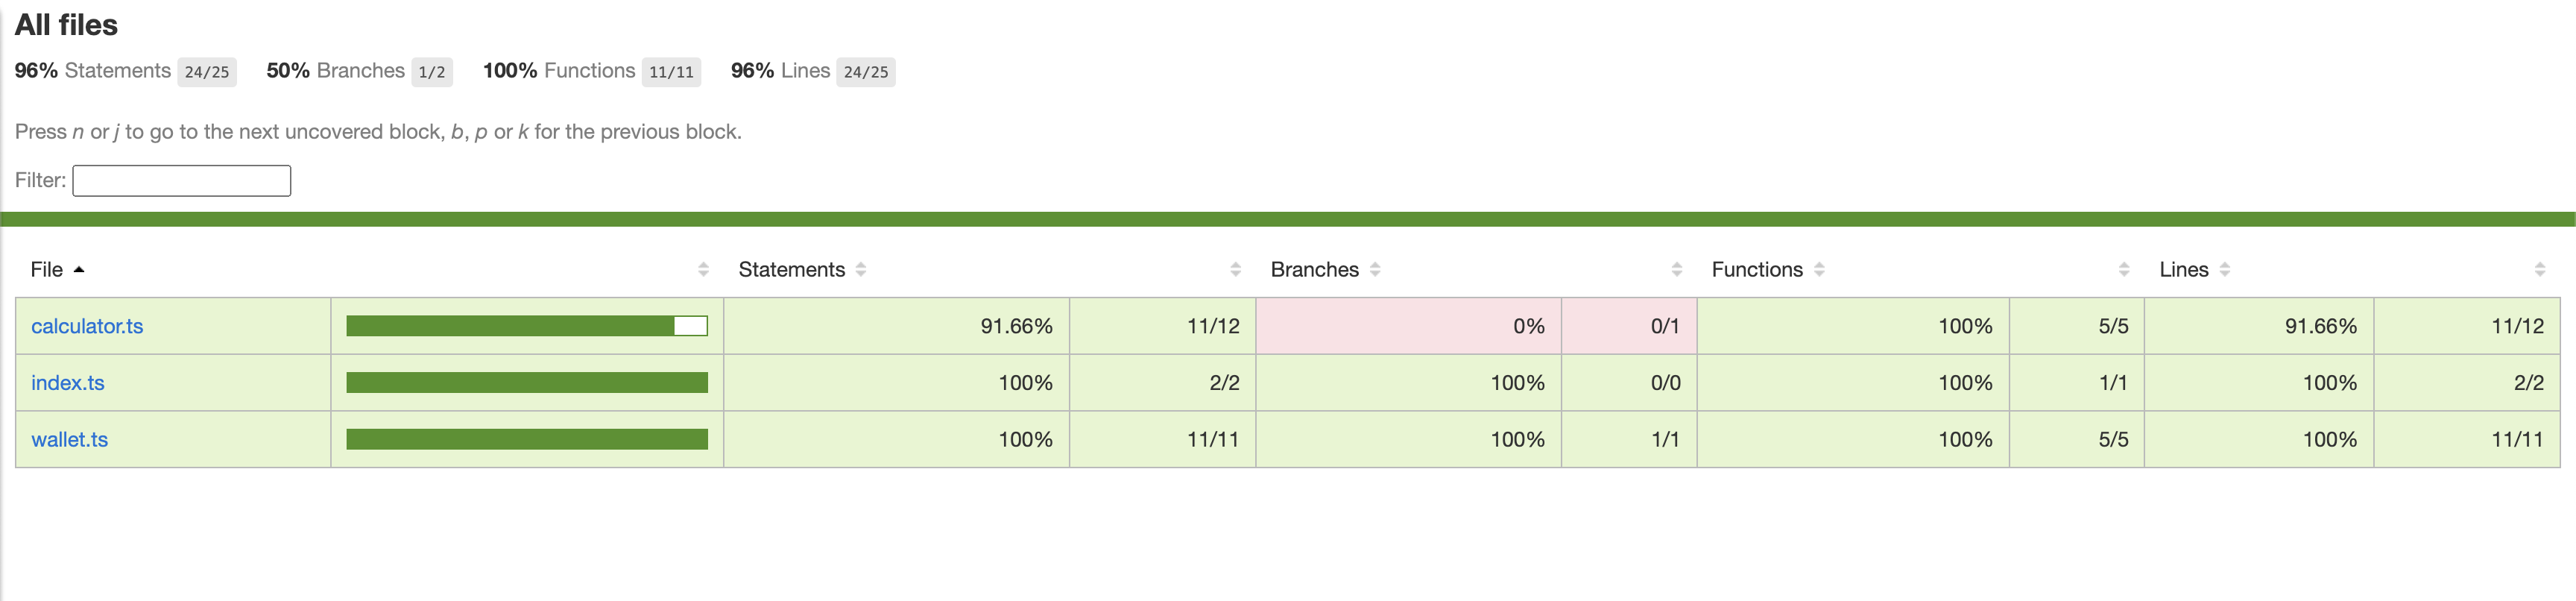
All files | 96 | 50 | 100 | 96 |
calculator.ts | 91.66 | 0 | 100 | 91.66 | 16
index.ts | 100 | 100 | 100 | 100 |
wallet.ts | 100 | 100 | 100 | 100 |
---------------|---------|----------|---------|---------|-------------------
Test Suites: 3 passed, 3 total
Tests: 1 skipped, 9 passed, 10 total
Snapshots: 0 total
Time: 1.521 s, estimated 2 s
You can see that calculator.ts does not have 100% coverage while others have it, because we don’t have the test that executes the if block that handles zero division scenario. When you run the above command, Jest creates another directory called coverage in your project, open index.html in your browser and see the beautiful visualization of your coverage output.
It should look something like this. One more beautiful thing about this HTML report is that you can see what code has been missed by your tests. Click on calculator.ts and you should see Jest highlighting if block.
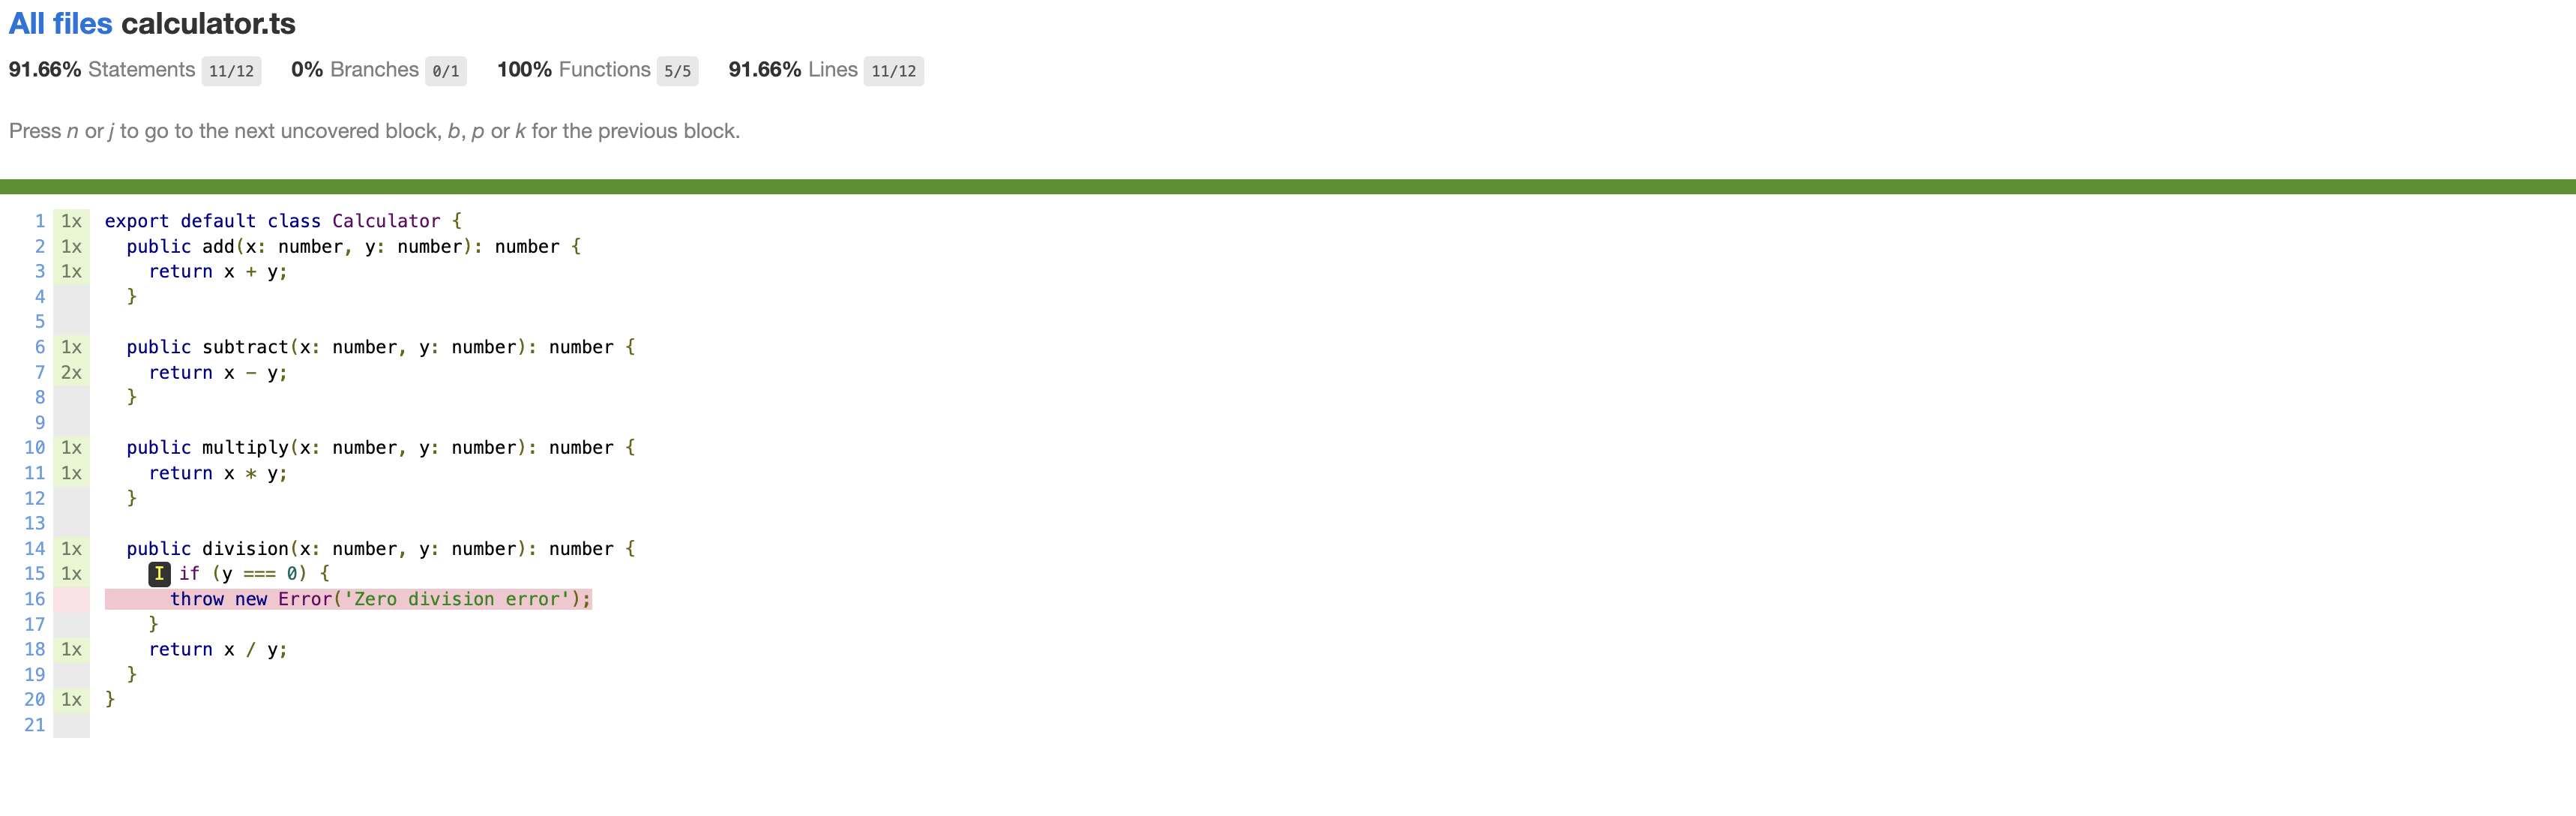
That’s awesome, isn’t it :) Now you can remove .skip from your tests, and see 100% coverage for calculator.ts
While the coverage tool is good, it often misleading as well. Let me explain you what I mean
Please comment out your expect functions in your test except for the last test which checks for exception, and run npm run test-cov . You should see that Jest says your code is 100% covered even though we commented on all our assertions.
So that is why, you should never rely on coverage report while deciding how much code is being tested. Now let's revisit our definition of code coverage
State based testing
So far you have been calling some functions and asserting the return value. It is called output-based testing. There is another form of testing, which asserts the object's state i.e. instance variables. Let's see how it looks like
class SomeClassWithState {
  public anInstanceVar: number;

  constructor(initVal: number) {
    this.anInstanceVar = initVal;
  }

  public increaseBy(num: number) {
    this.anInstanceVar += num;
  }

  public getVal(): number {
    return this.anInstanceVar;
  }
}

// Test
describe('test state based class', () => {
  test('test with state', () => {
    // Arrange
    const cls = new SomeClassWithState(10)

    // Act
    cls.increaseBy(5)

    // Assert
    expect(cls.getVal()).toBe(15)
  })
})
To practice it, let's Implement a digital wallet program. Write a class that stores user balance as a number, and create add, withdraw methods that adds money to the wallet, and withdraw it respectively
// wallet.ts

export default class Wallet {
  private balance: number;

  constructor(initialAmount: number) {
    this.balance = initialAmount;
  }

  public add(amount: number) {
    this.balance += amount;
  }

  public withdraw(amount: number) {
    if (this.balance < amount) {
      throw new Error('Insufficient balance');
    }
    this.balance -= amount;
  }

  public getBalance(): number {
    return this.balance;
  }
}
// wallet.spec.ts

import Wallet from './wallet';

describe('Test Wallet', () => {
  test('test add', () => {
    // Arrange
    const wallet = new Wallet(100);

    // Act
    wallet.add(100);

    // Assert
    expect(wallet.getBalance()).toBe(200);
  });

  test('test withdraw', () => {
    // Arrange
    const wallet = new Wallet(100);

    // Act
    wallet.withdraw(20);

    // Assert
    expect(wallet.getBalance()).toBe(80);
  });

  test('should not withdraw if there is no balance ', () => {
    // Arrange
    const wallet = new Wallet(100);

    // Act & Assert
    expect(() => wallet.withdraw(200)).toThrow('Insufficient balance');
  });
});
Stubs & Mocks
To explain stubs, and mocks better, I would like to start straight with an example program. Take a look at a following class Encoder, it has a encode method that takes some text as input and encodes it into a different string by shifting the characters by some random positions between 1 and 26 ( equal to the number of alphabets ). For example, if you encode abcz by shifting 5 positions it will become fgge ( you might have already guessed how z became e 😁 )
// encoder.ts

export default class Encoder {
  private readonly NUMBER_OF_ALPHABETS = 26;
  public encode(text: string): string {
    const source = text.toLowerCase();
    let result = '';

    const encodeWith: number = this.getASecretNumber();
    for (let idx = 0; idx < text.length; idx++) {
      result += String.fromCharCode(
        ((source.charCodeAt(idx) - 'a'.charCodeAt(0) + encodeWith) %
          this.NUMBER_OF_ALPHABETS) +
          'a'.charCodeAt(0),
      );
    }

    return result;
  }

  private getASecretNumber() {
    // generates a random number between 1, 26 ( yes the total number of alphabets :D )
    let min = 1;
    let max = 26;
    return Math.floor(Math.random() * (max - min + 1) + min);
  }
}
Before writing tests for the above program, please run it a couple of times and see the output. Did you notice that it changes every time? Yes, it is because every time we run it we generate a random number between 1, 26 and encode the text. How the hell do we test such code? We can only test if the program’s output is predictable, which means every time we run the program we should get the same result. We can’t test our code otherwise
How can we make the above code testable? To answer that let’s go to the roots of the problem. The issue here is our code is tightly coupled with the random number generator. Let's try to reduce the coupling by hiding our random number generation behind an interface
Step 1: Create an interface
// IRandomGen.ts

interface IRandomNumberGenerator {
  random(min: number, max: number): number;
}
Step 2: Create a new class and move the random number generator into it, and make sure your class implements the above interface
// randomGen.ts

export class RandomNumberGenerator implements IRandomNumberGenerator {
  public random(min: number, max: number): number {
    return Math.floor(Math.random() * (max - min + 1) + min);
  }
}
Step 3: Refactor your class to take the random number generator as the constructor argument, but instead of directly depending on the class, depend on IRandomNumberGenerator the interface instead
export default class Encoder {
  private readonly NUMBER_OF_ALPHABETS = 26;
  private readonly secretGen: IRandomNumberGenerator;

  constructor(secretGen: IRandomNumberGenerator) {
    this.secretGen = secretGen;
  }

  public encode(text: string): string {
    const source = text.toLowerCase();
    let result = '';

    const encodeWith: number = this.secretGen.random(
      1,
      this.NUMBER_OF_ALPHABETS,
    );
    for (let idx = 0; idx < text.length; idx++) {
      result += String.fromCharCode(
        ((source.charCodeAt(idx) - 'a'.charCodeAt(0) + encodeWith) %
          this.NUMBER_OF_ALPHABETS) +
          'a'.charCodeAt(0),
      );
    }
    return result;
  }
}
That’s it, we decoupled our Encoder class from random generation logic. Now while we implement our real code ( production code ) we can pass an instance of RandomNumberGenerator to our Encoder . While we unit test our code, we can pass a dummy implementation that returns a deterministic number rather than a random number. Let's write our test now…
// encoder.spec.ts

import Encoder from './encoder';
import IRandomNumberGenerator from './IRandomGen';

class RandomGenStub implements IRandomNumberGenerator {
  private returnVal: number;

  constructor(returnVal: number) {
    this.returnVal = returnVal;
  }

  public random(min: number, max: number): number {
    return this.returnVal;
  }
}

describe('test encoder', () => {
  test('should encode text correctly', () => {
    // Arrange
    const stubGen = new RandomGenStub(5);
    const encoder = new Encoder(stubGen);

    // Act
    const encoded = encoder.encode('abcz');

    //Assert
    expect(encoded).toBe('fghe');
  });
});
Let me leverage the same example to explain mocks as well. To do so, let's introduce a new feature in our Encoder program. The new feature requires us to log the results into a file in <text> is encoded into <encoded text> by shifting <numberOfChar> characters format.
Let’s modify our code accordingly
export default class Encoder {
  // .. code is stripped

  public encode(text: string): string {
    // ... code is stripped

    this.writeIntoLog(text, result, encodeWith);
    return result;
  }

  private writeIntoLog(input: string, encoded: string, shiftedBy: number) {
    try {
      fs.appendFileSync(
        'output.txt',
        `${input} is encoded into ${encoded} by shifting ${shiftedBy} characters`,
      );
    } catch {
      console.error('error logging into file');
    }
  }
}
If you observe closely, our program output does not really depend on the writeIntoLog function. Should we still test it? The answer is Yes, You should test every business logic. You should never leave a requirement untested. Always think in terms of business requirements rather than in terms of program outputs.
Now the question is, how to test the writeIntoLog function? One way could be, to see if the log text is written into the file during your unit test. That works and runs fast as file system calls faster in general, but what if you are writing into a database that is sitting remotely somewhere else? what if you would like to send the same text as a message to your user? Those requirements involve sending data over the network and making API calls during unit tests making them so slow. Then how do we test such code without actually using real APIs? That is where Mocks come into the picture
Just like the random generator problem above, our logic is tightly coupled with the file system to write the log. Lets now make our code and file system loosely coupled using interfaces, and constructor injection ( injecting dependencies using constructor )
Step 1: Create an interface
// ILogger.ts

export default interface ILogger {
  log(text: string): void;
}
Step 2: Create a new class and move the file system call into it, and make sure it implements the above interface
// logger.ts

import ILogger from './ILogger';
import fs from 'fs';

export class Logger implements ILogger {
  public log(text: string) {
    try {
      fs.appendFileSync(
        'output.txt', // Hardcoded for simplicity. Usually take it from some config
        text,
      );
    } catch {
      console.error('error logging into file');
    }
  }
}
Step 3: Refactor your encoder class to take logger as a constructor argument, instead of directly depending on the concrete class, depend on the interface
export default class Encoder {
  private readonly NUMBER_OF_ALPHABETS = 26;
  private readonly secretGen: IRandomNumberGenerator;
  private readonly logger: ILogger;

  constructor(secretGen: IRandomNumberGenerator, logger: ILogger) {
    this.secretGen = secretGen;
    this.logger = logger;
  }

  public encode(text: string): string {
      // ... code is stripped

    this.writeIntoLog(text, result, encodeWith);
    return result;
  }

  private writeIntoLog(input: string, encoded: string, shiftedBy: number) {
    const log = `${input} is encoded into ${encoded} by shifting ${shiftedBy} characters \\n`;
    this.logger.log(log);
  }
}
Awesome, we decoupled our Encoder from the file system. Let's now write the tests for it, in fact, we just have to modify our existing one so that, it not only tests for the output but also checks if we are calling the logging functionality correctly
// encoder.spec.ts

class LoggerMock implements ILogger {
  public called: number;
  constructor() {
    this.called = 0;
  }
  public log(text: string) {
    this.called += 1;
  }
}

describe('test encoder', () => {
  test('should encode text correctly', () => {
    // Arrange
    const stubGen = new RandomGenStub(5);
    const loggerMock = new LoggerMock();
    const encoder = new Encoder(stubGen, loggerMock);

    // Act
    const encoded = encoder.encode('abcz');

    //Assert
    expect(encoded).toBe('fghe');
    expect(loggerMock.called).toBe(1);
  });
});
Here we created our mock in such a way that it tracks if the function is called. expect(loggerMock.called).toBe(1); checks exactly the same.
But there is one more problem, writing these stubs, mocks every time is a tedious task and time-consuming. To avoid manually writing them, we use Mocking libraries. Jest has an inbuilt mocking library, but I liked a library called moq.ts, but you can use your library of choice.
Install moq.ts using npm
npm install moq.ts --save-dev
Let's remove stubs, and mocks that are manually written, and let's leverage moq.ts instead. Here is how the refactored tests look like
describe('test encoder', () => {
  test('should encode text correctly', () => {
    // Arrange
    const stubGen = new Mock<IRandomNumberGenerator>()
      .setup((randomGen) => randomGen.random(1, 26))
      .returns(5)
      .object();

    // const loggerMock = new LoggerMock();
    const loggerMock = new Mock<ILogger>()
      .setup((logger) => logger.log(It.IsAny()))
      .returns();
    const encoder = new Encoder(stubGen, loggerMock.object());

    // Act
    const encoded = encoder.encode('abcz');

    //Assert
    expect(encoded).toBe('fghe');
    loggerMock.verify((logger) => logger.log(It.IsAny()), Times.AtMostOnce());
  });
});
Thanks for reading :). I know it is a bit unorganized and feel unfinished, but I hope you learned something from it. Keep testing your code if you want some peaceful sleep at night 😁 and happy coding ❤️
You may also enjoy the related article I wrote about writing testable code. It has so much overlap with this post though. Here is the link if you are interested.